Some Thoughts & Some Decks: Having Fun & Anni Box 2025

WHAT IS UP SCRUB FAM!?

It wasn’t too long ago that Frisco Fahs, Richard Zapp, and myself ventured to Mesquite, Texas (Yeet) to reunite for some good times with friends while also playing some Dragon Ball! We competed in both events, Masters & Fusion World, and had a ton of fun – even managing to earn some high placements and get some SWEET prizing which even helped pay for the trip – dope.

It was wildly refreshing, especially since each of us had a much different approach this time than before: there was no mission other than trying to have as much fun as possible. That mantra carried through both our limited testing beforehand, as well as how we approached playing in the events themselves. There was no talk of metagaming or anything of the sort, just each of us playing a “good” deck we thought we’d enjoy.

Aside from the events being fun and INCREDIBLY well ran by PlayTCG!, we also spent a lot of time catching up with old friends, going out to dinners, trying new games, and most importantly – we were best friends, spending time together, all in one place. The weekend was amazing, and I know that we’re all jonesing to get out there and do it again… maybe we run it back in Dallas in September (Yeet)!

All of this is to say, hobbies are cool – especially hobbies that lead to awesome friendships. At the end of the day, we all love playing at Dragon Ball tournaments, but in reality they’re just an incredible excuse to travel somewhere with your best friends and escape from the “real world” for a bit. Winning is cool, but making memories is king.

Time to PIVOT!

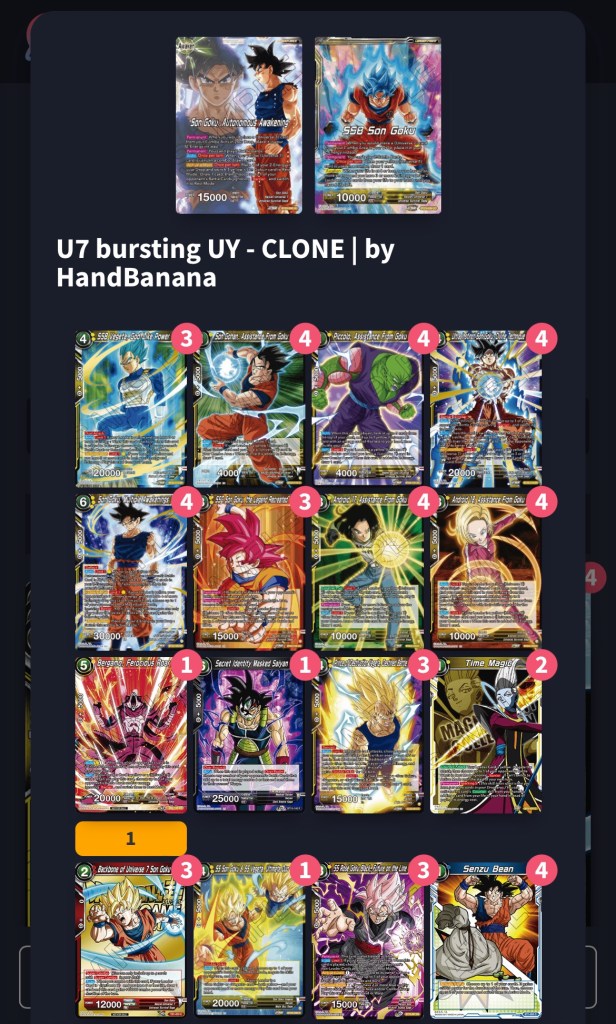
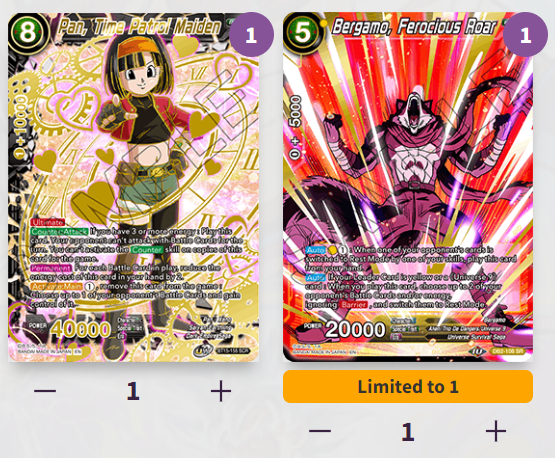
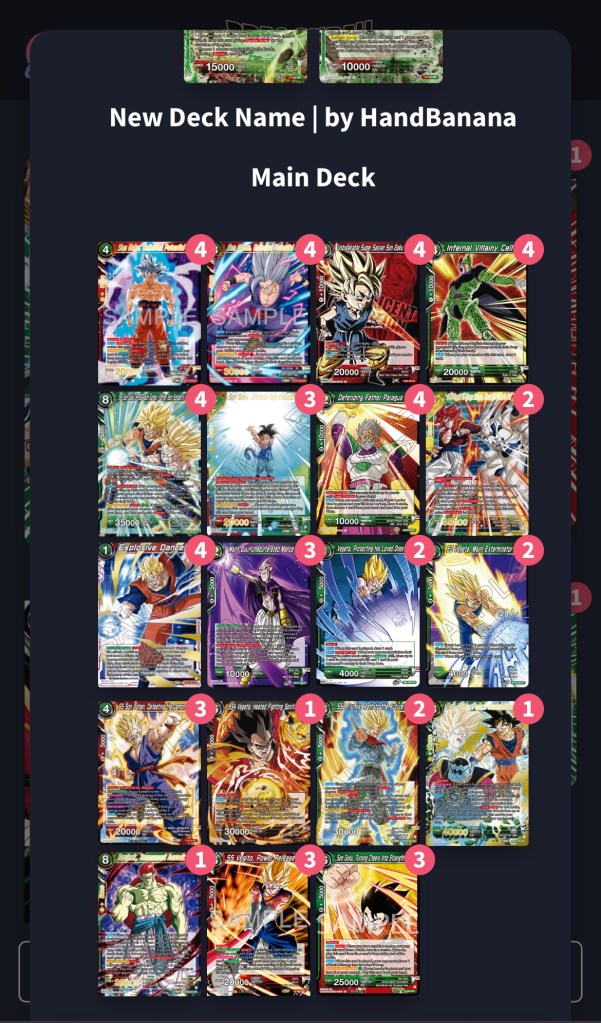
It was literally the Wednesday before the Anniversary Box spoilers dropped on the website and I was working from home, and it hit me… “there are so many good cards now, why hasn’t anyone messed with Surgeku or Surge Broly?”

This then led to me brewing a Surgeku deck and a Surge Broly deck and playing some games with Frisco where he was trying out Gamma. Ricky (Richard Zapp) ended up hopping on to spectate and after playing with both decks, we were all quite impressed with how well they were keeping up with Gamma. Surge Broly even won a game!

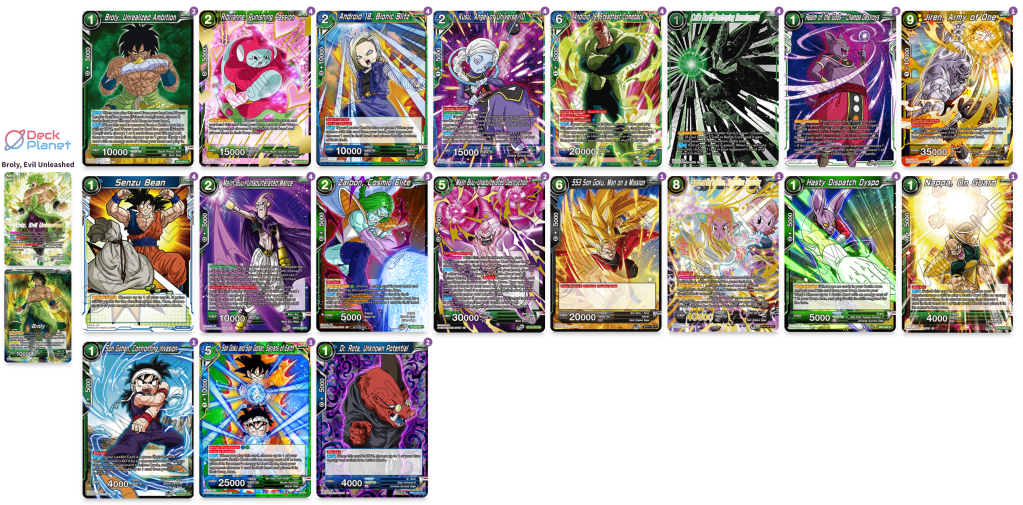
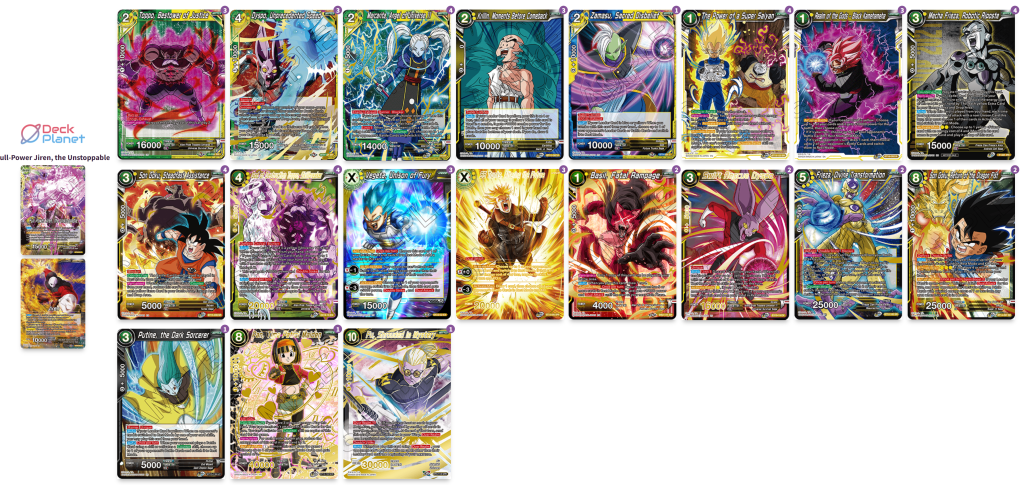
Here is the updated Surge Broly R/G list:

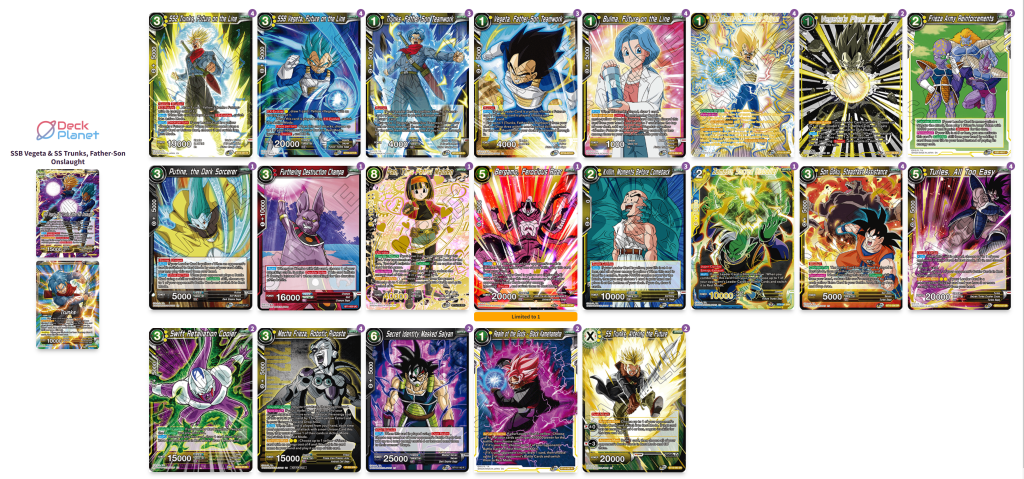
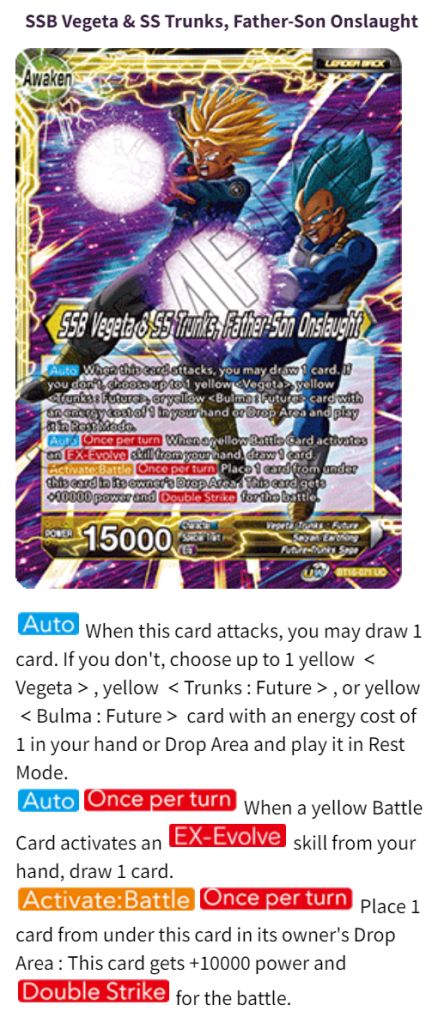
Yea, I know… there was no Anniversary Box support, but man drawing cards from comboing is so good. Also, the leader’s awakened side is so powerful, giving you access to unconditional removal at instant speed, as well as giving you a boosted Furthering Destruction Champa that lets you reuse a Super Combo from your drop area – cracked.

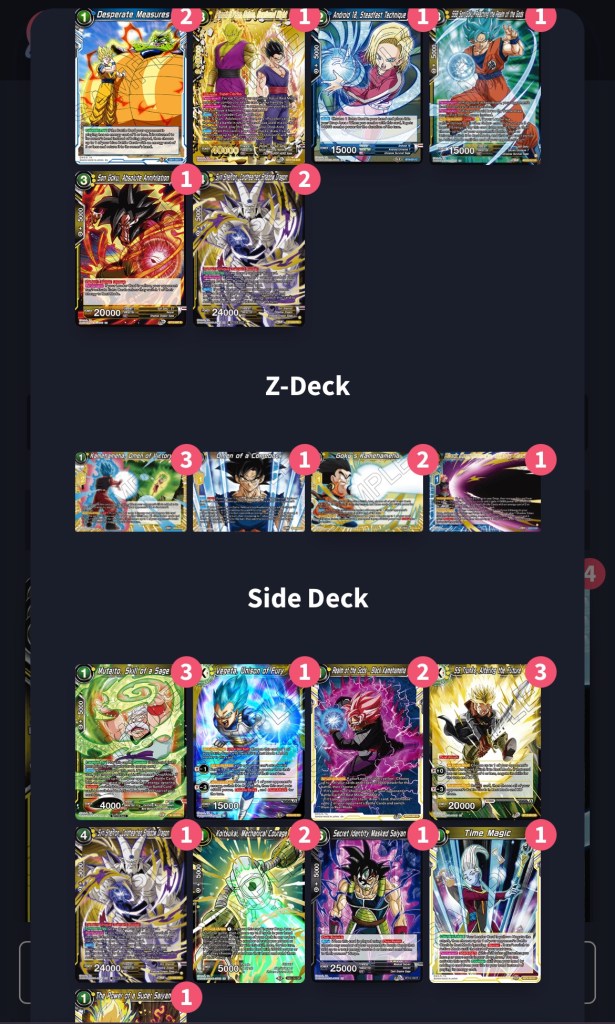
With the new red cards from the Vegeta deck, Explosive Dance, Vegito negate, Cheers into Strength, and SS4/Omega 8 drop – the deck really does have it all. These cards really are just the beginning though and honestly, the leader and the fact there is no engine gives you so much room for creativity as evidenced by this deck below I just worked on yesterday, Dark Broly Surge:

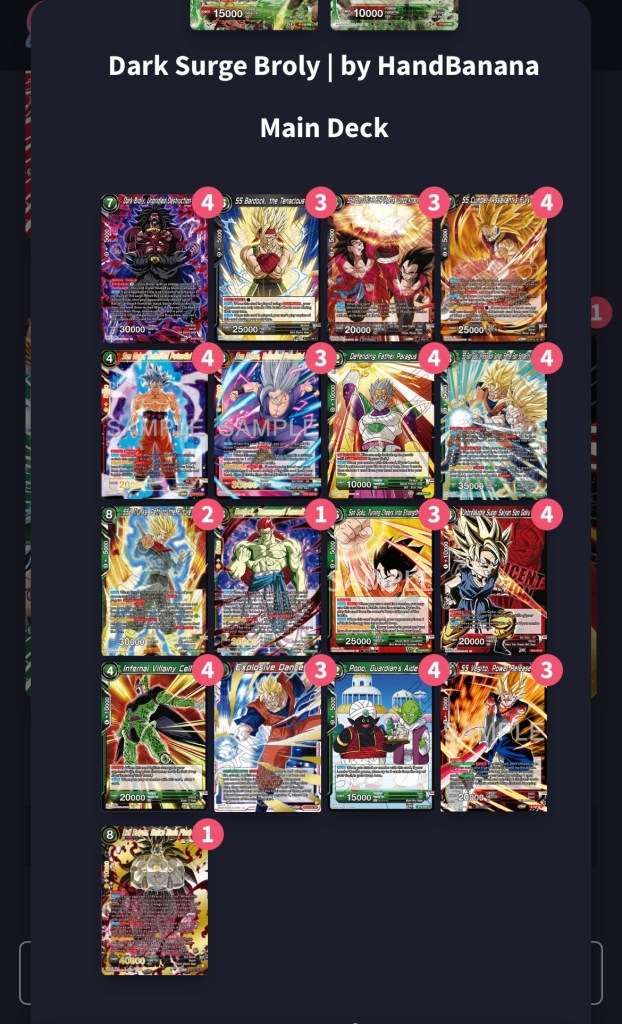
Absolutely wild that you can play the Unlimited Potential package from Vegeta, the R/B Dual Land Dark Broly, Bardock, the Tenacious, Cumber 7, your powerful green cards, and Evil Saiyan SCR – all in the same deck.

Now… why you’re actually here

First off, let me just say that a LOT of my favorite gaming memories I have are when the boys and I get in the lab and we’re just spewing card recommendations, feedback, and neat ideas that we can all take and apply to whatever deck we’re building at the time. The level of encyclopedic knowledge and the creativity that Frisco and Ricky possess are incredible, and I am so blessed to have them for stuff like this.

Last Friday was an amazing day – new support was released for one of my favorite Leaders and trust me, the nostalgia was at an all-time high. Back when the Surge Expansion came out, followed by Draft Box 4 and Set 9, the space for creativity was infinite. To a lot of the community, that period was the pinnacle of Masters, and just having the ability to pour our love and creativity into that again in 2025 is awesome.

Surgeku GoodStuff:

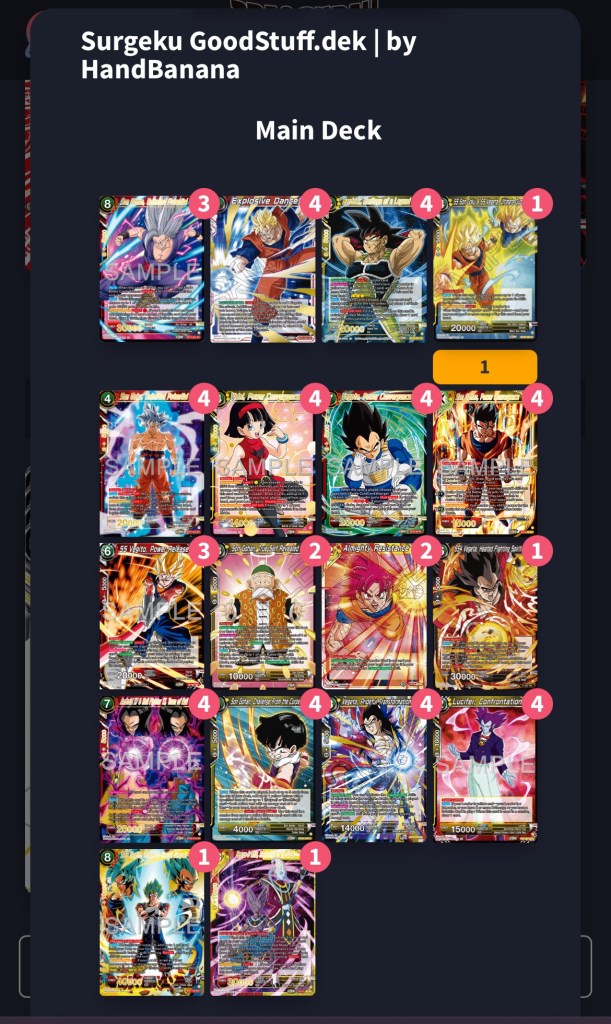
The best part about Surge decks are that there are so many choices to make and you will never actually know which are the most correct. For me, I tried to play a dual-color heavy build but ultimately hated not doing something of the first turn of the game, as well as playing cards that I would never realistically cast during a game.

Now, let me talk through some card choices:

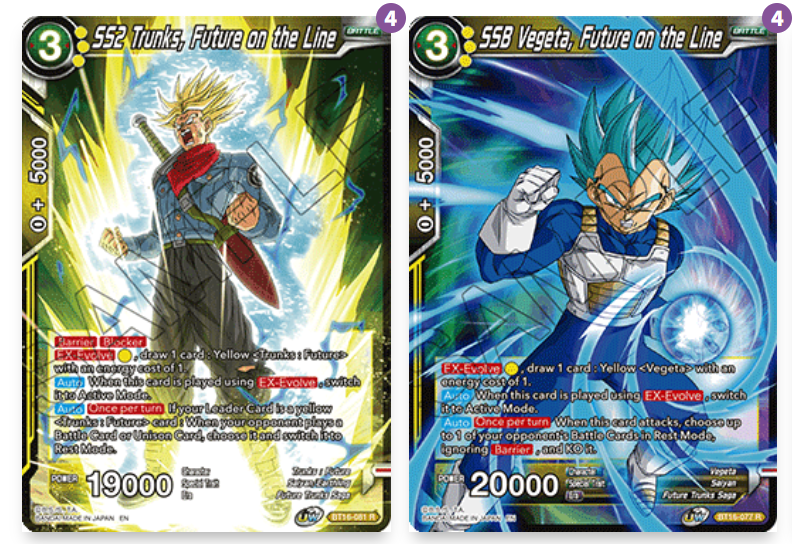
Originally, I was playing a 1-cost Goku that searched the top 5 for a Yellow <Saiyan> cost 4 or less. This was due to me really wanting to play the 4-cost Majin Vegeta that gained Double Strike when you had a Yellow Son Goku in your Z-Energy. After playing some games, the Vegeta was hit or miss and often I just wanted to be playing something else. Not only that, but I was using a Goku Super Combo that was only active at 4 life to also support the Vegeta, and the one thing I did learn from dual-color builds was that being able to use the Beerus Super Combo above 4 life felt good.

Once I scrapped the 4-cost Vegeta, Frisco and I then spoke about how the best turn 2 play for the deck was Unison + Videl and Frisco wanted to try and make that happen more frequently. That is where he stumbled upon Son Gohan, Challenge from the Corps, which searches the top 5 for a Yellow <Saiyan> or <Earthling> cost 4 or less, or a Yellow Unison with a specified cost of 2 – perfection.

Going this route also allowed me to change my Super Combo to Lucifer, an Earthling, that you can search for and use once you have two Z-Energy. If you are trying to get your Super Combo online early with Z-Energy, you may as well commit to making Z-Energy a priority and play Bardock, Heritage of a Legend – also searchable via 1-cost Gohan. To also help with Z-Energy creation, be sure to play Android 17 & Hellfighter 17, Team of Hell – which can be played using any color and once in play gives you another card that replaces itself and gives combo value.

Another thing to bring up is the value of the <Saiyan> trait and the ability to harness that for free defense via SS Vegito, Power Release. The cost of this card is just deck building and honestly, it is worth it. For additional free defense, courtesy of Richard Zapp, be sure to play some Son Gohan, True Self Revealed to combo with your Son Goku, Unlimited Potential.

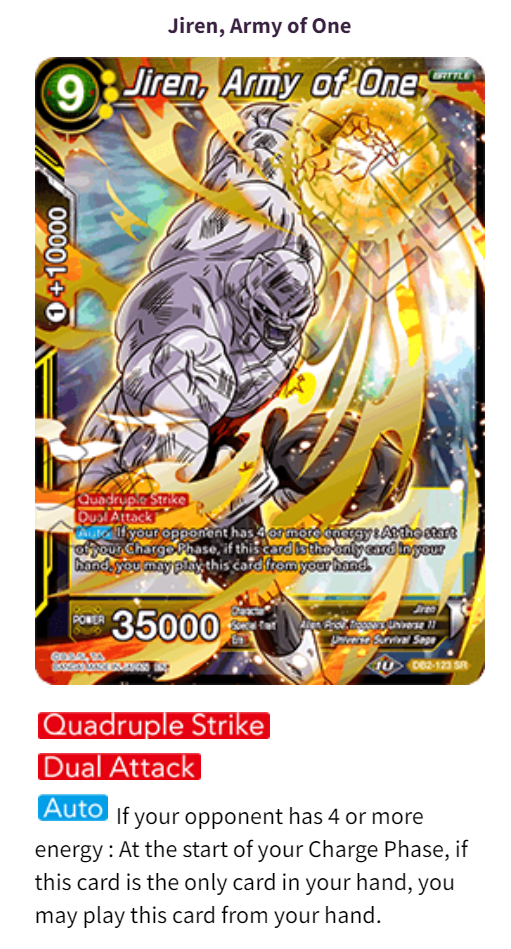
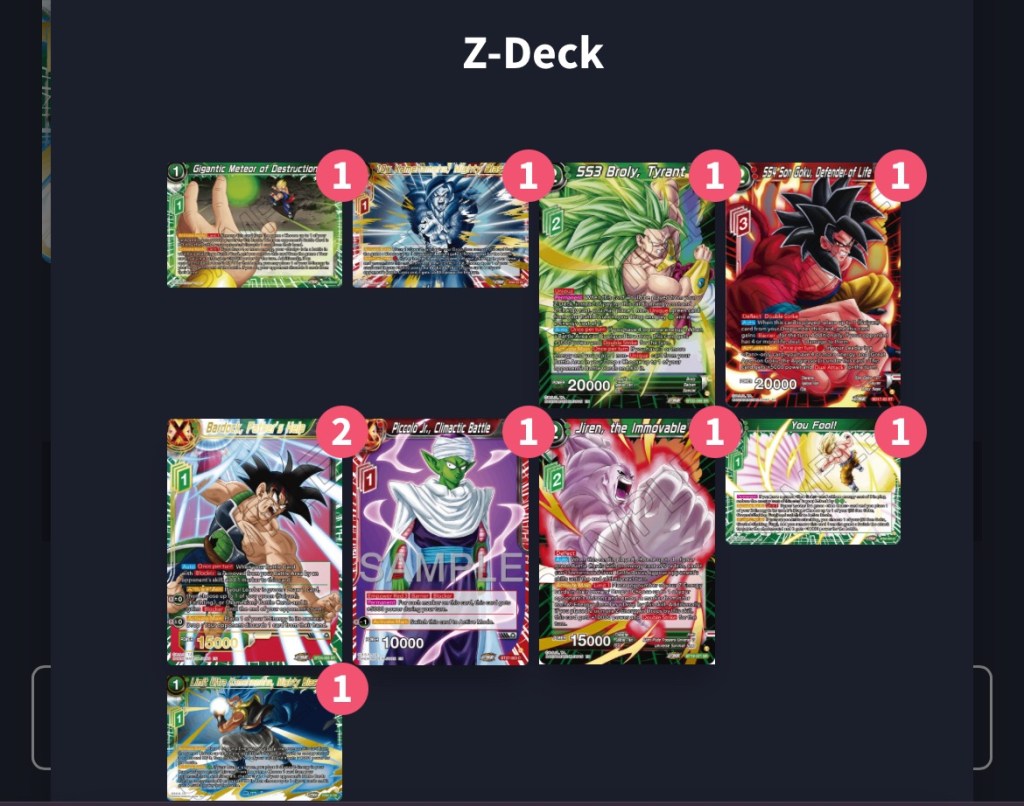
As for the Unison, big props to Dane with his list as it convinced me to go all-in on Prideful Transformation – also searchable via 1-cost Gohan. Playing the full 4 copies of the Unison is more than worth it, even if you just use it to fuel your Z-Unisons with Empower. Thank goodness we get to also take advantage of the Z-Unisons played in both the Yellow Broly deck, as well as the Red Jiren deck – OH THE CREATIVITY!

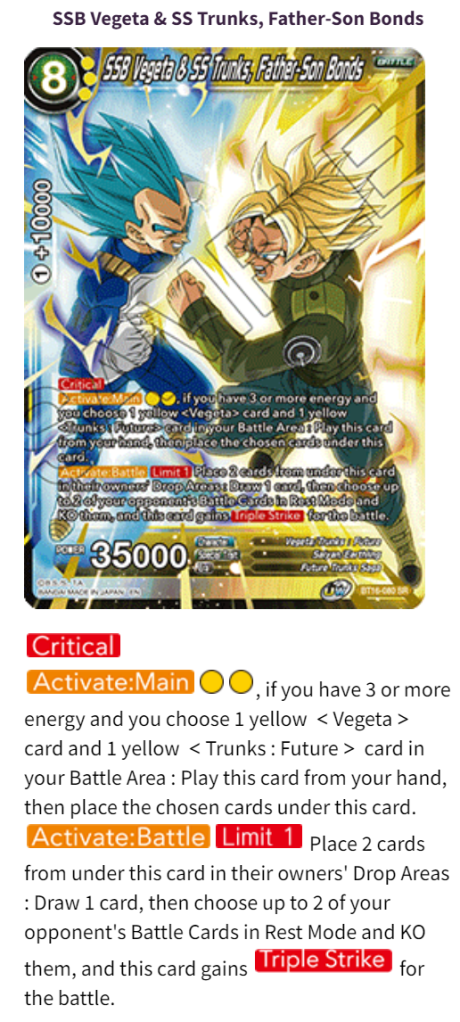
The last two things I will touch on are the SCR and Almighty Resistance. Originally, it was Gohan/Piccolo, then it was Gogeta, and then again Ricky popped in with his own list and he was playing SSB Vegito… absolutely genius. It costs just one red energy, gets back any red card from the drop, and has Triple Strike – which is huge for a deck that needs the closing power. The card also lets you have enough energy left over for Almighty Resistance, which you cannot even use with Gogeta SCR… as Ricky reminded me, haha.

As you can see… a lot of feedback, creativity thoughts, and unique ideas from different people went into this deck. At the end of the day, this is what makes Surge decks so friggin’ cool and I am so happy they are back.

#happytesting #scrubfamisbestfam #kthxbai

DBS Nats 2024: As it Stands…

Another year, another DBS TCG Nats article! It is kind of wild to think that that DBS Masters is 7 years old and our friend group has stuck with it all this time. There is just something that keeps pulling us in, set release after set release; the magic, old friends, new friends, the journey, the testing process, the conversations, the vibes – as it stands… it can’t be duplicated.

The Preparation

DBS has been on the backburner for most of the year with the increased responsibility at work and all the adventures I got to take with the wife. This led to the Florida regional in November being my first event of the year in hopes of obtaining the round one bye at Nationals. To accomplish this I played a budget build of Green Gohan and went 5-2 to earn the bye – not too shabby!

With that out of the way, and Nats not being until late January, the 3xG boys had plenty of time to test… or so we thought haha.

Between the holidays and living our grown-up lives, the nerding was condensed to roughly 2 nights per week for about 2.5 hours, which in DBS Masters we know that means that you’re getting at best, two games per night.

This led to us ultimately choosing the “work smarter” approachtowards the end of December and having Frisco and I play the same exact deck for the event since there was only a limited amount of time to collect data prior to traveling to LA.

The Meta

The community narrative always seems to play a huge role in determining what the Meta is. This along with some data from the other National level events gave us some decent indicators of what the most popular choices may be heading into US Nationals.

For me personally, this was my list in order of what we thought would be most prevalent:

1.) Mono-Yellow U7

2.) Green Gohan

3.) Android 21

4.) Cooler

5.) Jiren

6.) Gohanks

7.) Mechikabura

8.) Pan

9.) Expert Deck 21

In hindsight, we were close to correct – with the only changes being that Gohanks should have been higher than Jiren and Cooler, and Mechikabura should have been lower on the list.

With this list and some early results from National events rolling in, I updated my build of Green Gohan and purchased the cards for Jiren and U7 Goku as all three of these decks were the ones I was most drawn to playing based playstyle.

The Decision

Deck selection in DBS Masters is always so difficult since the Meta is wildly unpredictable and with 400+ players in attendance, you just have no idea what you’re going to see in the first few rounds of any event. You could roll into the event with the best deck for your predicted matchups and find yourself losing the opening round to Raditz. For this event, there was no clear-cut absolute world beater of a deck that existed, so ultimately you had to play something you felt could keep you in any game and didn’t depend on high-rolling each round – this led to the early dismissal of Jiren.

Now that I was down to Green Gohan and U7, I did a ton of work while at the office to figure this out from both sides of the table. I would bring my deck boxes to work each day and run the matchup repeatedly to find the exploitable weaknesses on both sides. This paid huge dividends in Frisco’s top 16 games against Green Gohan to get him into top 8.

Here were some of my findings on the Green Gohan side:

1.) Universe 7 hates 15k swings – a 2/2 split of King Vegeta and Meta-Cooler Unison was most optimal in the pre-side BO1 environment and you should side the 3rd Meta-Cooler.

2.) Fated Rivals Son Goku is a 2 of in your 65 due to how well it plays against Syn Shenron and Mutaito.

3.) If you don’t open Vegeta/Trunks, holding up Uneasing Awakened Rage and negating their first swing to draw a card does a ton to set them back on developing Z-Energy.

4.) 3-4x King Cold in your 65 feels mandatory as once you get your Z-Extra online you’ll stop their turns with ease and have a 15k body to swing with.

5.) Always play around Vegeta combo by attacking with non-barrier cards first and then swinging with battle cards as soon as they’re played.

6.) Bardock Unison is a trap, along with thinking Koitsukai can be your out to Mutaito – Focused Breakthrough is better if you’re going that route.

7.) 2x Cooler Counter main and side the third to interact with 4 drop.

8.) If the U7 player is highly knowledgeable of the matchup, they will attempt to leave you at 5 or 6 life. If you have the option, use Hyperbolic to take you to 4 life.

9.) 1x Golden Frieza Unison in the 65 as an out to the 6 drop if needed, and a great threat to win the late game.

With all of this in mind, you could get to a spot where Green Gohan was favored against U7 Goku. And with all this knowledge I was super close to playing Green Gohan for the event; I just knew that with the time I had to test with Zapp and Frisco, having us play 2 different decks would not allow us to get as much data as possible.

Here were some of my findings on the U7 side:

1.) If you’re Mono-Yellow U7, plan to awaken on the opponent’s turn 3 and stagger your combo to get out of 15k swings unscathed. Also, be intentional with getting an Omen of a Comeback down going into their turn 3 to aid you in reducing your need to take the -2 for Nimbus.

2.) If you have Mutaito for Vegeta, use it. Making Green Gohan expend more resources to get additional Z-Energy is worth it. In addition, if the Trunks is stranded under Hyperbolic then the Gohan player has to either tuck a Goku to awaken without going to 4 or tuck a Gohan and take themselves to 4 life.

3.) You don’t have to win the game, they do. Green Gohan has a small number of cards that threaten you. If you spend the game removing their board and killing their Unison you reduce their ability to combo for free on their leader skill, netting them cards, and reduce the number of ways they can kill you.

4.) If they don’t take themselves to 4 life, let them starve. This ties to the item above as well, but if the Gohan player camps at 5 or 6 life, then their hand size is greatly reduced. As you continue to disrupt with Mutaito, Android 17 counter: play, Syn Shenron, etc.; you’ll run them out of cards quickly. From there you can start burning with 4-drop to keep their hand size low, and then chipping them for 1 damage a turn with a Battle Card until you win the game.

5.) SS4 Goku, Absolute Annihilation > Swift Retaliation Cooler. With Uneasing Awakened Rage, King Cold, and Bursting Rage, Green Gohan has a ton of defense to stop from losing to Cooler. If they aren’t tapped out and they King Cold, you can Cooler them but if you’re not swinging for lethal you’re just going to get Uneasing on the next swing. On this same play if you have Annihilation and they King Cold negate, tapping themselves out, you can swing through the floodgate and they have access to none of their other defense.

6.) When in doubt, tap them out. This more so applies to the specific version of U7 that we played for the event, but still rings true in the matchup. If Green Gohan is chilling on one open energy and you can tap it down, you dramatically decrease their defensive ceiling.

These specific items, combined with the findings on the Green Gohan side, led to me feeling that U7 was the pick for the event, just not the stock build of U7.

“Wait… you charged a blue?”

How we ended up getting to the variant of U7 we played is a great example of our teamwork, creativity, and our ability to identify a particular style of play that would bode well in the majority of the matchups we planned on seeing.

Early inspiration came from when Richard Zapp tested the theory of adding a second color, testing out a Red package that included Gohan Counter: Play which would function as a 20k Double Striker that we could play for 1 one offense, and also the Frieza Swap package featured in Red U7 Gohan. This deck ended up being cool, but still had a bit of the problems we had noticed from Mono-Yellow U7, with the upside of having more efficient threats that you could play.

We ultimately felt that Mono-Yellow U7 was too predictable and very easy to sculpt a gameplan against. The main and most popular one being that the deck cannot deal with a board of 15k swings a.k.a. Jiren, Gohanks, Pan, Green Gohan with Meta-Cooler Unison, and Mechikabura. These decks also share a similar weakness – they hate being tapped out and often leave 1 energy up to defend themselves.

These data points led to Frisco jamming 7 blue cards, 4 being Senzu Bean, and the rest was a ton of work put in by the whole crew to get us to where the list ended up for the event.

Here is the list we ended up on for the event:

Stats for the deck:

Only 2 copies of the deck in the event

16 rounds played

12 wins (1 being an exact mirror in round 5)

4 losses (1 being an exact mirror in round 5)

75% win percentage overall

1 made top 8 #FrisGoat

1 finished 57th #scrubfam

Not too shabby!

Decks like this are in Frisco’s wheelhouse, especially with all the reps he has from playing Launch, which funnily enough everyone expected him to play again at Nats. Does it really all boil down to Senzu Bean? Hmm.

In the meta game at the time, a lot of the decks, including Mono-Yellow U7, that choose to be proactive all have very similar points of failure. All their plays are scripted for the most part and they all rely on 1 or less energy to defend themselves.

That was the biggest issue with standard U7, you fell into that trap, and you also had no way to punish the opposing decks outside of Bergamo, Ferocious Roar – which you only have one of. What we did was dial that up to 100 and always give ourselves the ability to play on the opponent’s turn. Whether it be Syn Shenron, Goku Black, or Bergamo we always had something that could threaten to steal tempo in the early stages of a game. 

Being on the play with a Goku Black to start was just devastating to a lot of decks, especially when you then warp it the next turn and always have access to it for the duration of the game. Once this happened, the opponent could never feel safe and as the U7 player if you just happen to leave permanents in play, you can just activate the card without having to combo which always felt awesome.

Frisco and Zapp picked up on this early on – you can’t be a Swift Retaliation Cooler deck. This led us to lean into Absolute Annihilation and boy… did it annihilate some folks’ tournaments. With the way the deck is played and our ability to keep opponents tapped out, dropping Absolute Annihilation into 6 drop usually forced a scoop. 

With this removal of Swift Retaliation Cooler and our lack of love for Bursting Rage, mostly due to it only being good at one specific spot in the game, we turned our attention to other SCRs and with Frisco’s testing we ended up on Piccolo & Son Gohan SCR – which was completely correct for the event.

Another brilliant thing about the blue splash for Bean is that we got to trim on negates by a substantial amount. As most U7 builds run 7 to 8 negates in their main deck, we got to cut that down to just 2x Time Magic in the main, with a third in our sideboard and ZERO Flying Nimbus… what an amazing feeling.

In hindsight, the only thing I think we would do differently is dedicate a lot more time to testing against Android 21 and finding a surefire strategy to win those games post sideboard. That was our biggest issue between the three of us testing, just not having the time or bandwidth to learn how to play Android 21 effectively and also beat Android 21 – which led to us essentially being okay with losing to the deck and instead making almost every other matchup be favorable, including Cooler (hint: side out battle cards for Unisons, focus on using 4 drop burn, and rely on big leader swings plus Goku’s Kamehameha to pressure them).

Conclusion

The event was amazing overall, but more so the time with friends and the community. The game is in such a great spot, and I couldn’t be happier that Bandai is keeping the momentum going with this upcoming set release and by already announcing events for the next organized play season. As life continues to go on and the number of games we play becomes less, I don’t think I will ever truly be able to let DBS Masters go. Right now, the game is in this place where it is so rewarding to play and get better since ultimately skill plays such a large role in someone’s success – which is a beautiful place for this game to be. Complexity may be high, and the number of new players might be lower than we’d like, but if you’re a lover of TCGs and competitive gaming, DBS Masters is at the pinnacle of games that offers such an awesome tabletop experience for those looking to be rewarded for the amount of time they invest.

I truly can’t wait to go to more events this year and of course to see you all again at Nats/Worlds next year. This community and this game are forever goated. Thank you so much for taking the time to read this and I wish everyone the absolute best – can’t wait to meet again!

The Lorcana Chronicles: “The Chad”

It’s been a few weeks since Lorcana released on Pixelborn and the amount of lessons I’ve learned has been quite overwhelming… in the best way possible. I’m not sure when I’ll obtain cards or if I’ll be participating in the competitive scene, but Lorcana’s base set so far offers a lot of room for exploration, deck tuning, and overall refinement of the “best” archetypes.

Today, I want to focus in on the color combination I first started with – Amber/Emerald “Aggro”. Here is the very first version of the deck I posted on August 28th:

As you can see from my handiwork I was unfocused, unsure, and just trying to play cards I really liked based on experiences from other games.

In this part of my own process I really try to throw as many different cards into a deck as possible just to get a feel for the various cards, mechanics, curve, and the tempo of average games. What’s awesome about this part of the process is you really start to learn a lot about not just the cards in your deck, but how they play in the world around you. This then leads to you starting to explore decks that may be better homes for the cards you tried, that didn’t necessarily work out here.

From this point, I then started down the path of constructing Amber/Steel Midrange decks since I fell in love with the bodyguard keyword, removal options, and the incredible power of Stitch and Tinker Bell – especially when combined with Ariel, A Whole New World, and Grab Your Sword.

The love affair didn’t last too long though, as mirrors became more prevalent and most of the time it felt like who ever got to Ariel, Tinker Bell, and/or Stitch first was massively ahead. To the point where games were just decided by who could do a double activation of Grab Your Sword for the complete blowout.

It wasn’t just the mirrors though, as I still wholeheartedly believe that Ruby/Amethyst has the best matchup spread in the format and on any given day can be constructed to combat Amber/Steel. This is mostly due to Amber/Steel just not being fast enough, nor does it have a high number of true threats that constantly force Ruby/Amethyst into a tough spot as the game reaches the later stages. There’s no better top-end than Maleficent 9 and Elsa 8.

So… 17 days have past since I posted my first Lorcana deck, where are we now?

As you can see, I know exactly who I am and you can truly see just HOW BAD I WANT IT!

1 Cost Units – 12

4x Lilo

4x Stitch

4x Duke

Lilo is who you want all of the time, but you also just want some 1’s that can trade in the early game, put some lore on the board, and be inkable when the game starts to transition to the mid-late stages. It’s important to note that you don’t want to play too many, as they are often the absolute worst card to draw.

2 Cost Units – 12

4x Flynn

4x Simba

4x Cruella

Simba plus Lilo is always such an optimal start, but also there’s a lesson to be learned about patience when playing a deck like this – you just can’t turn your cards sideways every turn. There are a lot of games where you don’t have Simba and it’s important not to be too hasty in exposing your Lilo. There are scenarios where the optimal line is playing Lilo on 1, foregoing questing on 2, and playing Flynn to continue taxing the board. You then can go into Mickey or Cat on 3 and then wait to quest with all of them on turn 4 to get the max value possible, and make challenging awkward for the enemy player.

Flynn is also the guy you want to often expose when you’re trying to setup for You Have Forgotten Me. There are so many games where you’re going second and you instantly pull ahead with that line of play; especially when the enemy player is on control or midrange and they’re forced to ink every turn, driving down their handsize.

Cruella has the upside of being very sticky with 3 willpower and the ability to offer removal, which were very thin on here.

3 Cost Units – 8

4x Mickey

4x Cat

Cat is a problem that enemy players hate having to address and Mickey being a 3/3 also does a great job of being a lore threat that can lead to positive challenges for you. Neither cards are bad top decks, as more often than not when you’re so far ahead they end up trading for some of the enemy’s best removal effects – keeping you ahead.

4 Cost Units

4x Hans

4x Tinker Bell

1x Hades

Hans always has to die, but he also always gets his money. This leads me to another segue, as it’s important to realize that when playing against midrange and control your goal is to build a lead, whittle away at the enemy’s resources, and tax their removal with lethal threats, like Hans.

Tinker Bell’s inclusion came from my exploration phase where I played a ton of Emerald/Steel Midrange; this is where I learned about how amazing evasive units are! Tinker Bell and other evasive threats are so powerful since they force the enemy player to use a piece of removal, and in some cases even trade for a Be Prepared, all on their own.

The inclusion of Hades is to demonstrate just HOW BAD I WANT IT. Kuzco is the best card in the deck and we want more copies of Kuzco. Hades is also a flex slot dependent on the metagame. If the field is more Amber/Steel, you probably want Mother Knows Best as a way to bounce an Ariel or Tink 3 to stop the song combos. If the field is more Ruby/Amethyst, you’ll want to stick with the recursion from the discard pile that Hades offers.

5 Cost Units

4x Kuzco

4x Mad Hatter

Both of these quest for 3 lore, but Kuzco limits the points of interaction for the enemy player. In a lot of my games I’m very patient with deploying Kuzco, unless I’m so far ahead it doesn’t even matter. In the most prevalent matchups you’re constantly dancing around cards like Maui, Grab Your Sword, Be Prepared, etc. so you’re usually trying to have Kuzco be the last man standing.

I think I’ve maybe drawn 2 cards off of Mad Hatter in my lifetime, but that definitely doesn’t take away from how strong the card can be. This is especially true in low resource games where you’re just hoping to top deck a threat to continue filling your board or win the game outright.

6 Cost Units – 4

4x Genie

Christina Aguilera does not get enough love.

Anyway, so yea there’s that.

Really though, I’ve already explained how powerful being evasive is, but Genie is truly so much more. Genie’s bounce effect is obviously good for clearing problems that don’t have strong entering play effects, like Mickey 8, or Aladdin 7.

The true power of Genie, in my opinion, actually comes from being able to bounce your own threats, saving them from challenges, and establishing an evasive threat that must be dealt with; this is why we play the full 4 copies.

A great example is when it’s late in the game, you played a Kuzco last turn and you want to quest. Normally, there would be risk involved, but not anymore! Instead you can quest with Kuzco for full value, play Genie to bounce your Kuzco, and now you have an evasive threat in play. This then lets you play Kuzco safely and rely on ward to force the opponent into a situation where they have to have a Be Prepared, or they just lose.

Lastly, don’t sleep on Genie to bounce Genie to then replay Genie to bounce Genie.

Yo dawg, I heard you like Genies…

Songs and Actions – 7

3x Be Our Guest

3x You Have Forgotten Me

1x Part of Your World

Be Our Guest also = more Kuzco.

BOG is a card I’m learning to love more and more as it truly is a “swiss army knife” in this deck.

Part of Your World = more Kuzco.

Similar theory to Hades, but just wanted a song that we could free play in games we’re low on ink. Again, if the metagame is more Amber/Steel I’d probably opt for another Mother Knows Best.

You Have Forgotten Me, aka Cell’s Absorption, is a card that can read pretty medium if you haven’t played any games. Instead it’s a fantastic way to end a lot of games, or even a way to accelerate the enemy player into top deck mode when you’re ahead. YHFM also is a card that lets you punish the game’s resource system, which can be quite an advantage if you’re going second if the enemy player inks and plays a 1 cost unit, putting them down to 5 cards already. YHFM is also your way to punish ink hungry control decks that want to have 9+ cards in their inkwell.

Final Thoughts

I’m actually kind of bummed that new cards are already being previewed, as I feel that the puzzle of base set 1 is definitely not 100% solved when it comes to archetype refinement. I do think that the best 3 decks are Ruby/Amethyst Control, Amber/Steel Midrange, and Amber/Emerald Aggro – as they all tend to check each other fairly well and capitalize on the weakness of other color combinations.

As for my build, “The Chad”, I really tend to enjoy the simplest competitive archetypes because they often are the most rewarding since you put the enemy on a clock and all you’re trying to do is race to the finish line before crashing. And shoot, what could be more “Chad” than jamming cards with the highest lore values into a singular deck?

My advice for you brewers out there just getting into the game: brew away and enjoy the creative space that Lorcana’s base set offers. For the tuners and netdeckers: there is so much room for refinement and so much information at our disposal already, keep on learning and keep on tuning.

Crimson: Pacing Matters

“Activate Battle: If this card is in a battle and you choose 1 Saiyan card in your hand and discard it: Draw 1 card, then add up to 1 card from your life to your hand and negate this skill for the battle.”

“Awaken: When your life is at 2 or less or you place 5 Saiyan cards under this card from your Drop Area: You may draw 3 cards, switch up to 1 of your energy to Active Mode, and flip this card over.”

Crimson has officially won 3 National Events and, per usual, the question of Bans/Errata have already started to bubble up in the community. Before we even begin to dive into our thoughts on that topic, we must first try and understand how the format completely flipped from SS4/Syn dominance, to…

Yo, listen up here’s a story
About a little guy
That lives in a blue world
And all day and all night
And everything he sees is just blue
Like him inside and outside

Blue his house
With a blue little window
And a blue corvette
And everything is blue for him
And himself and everybody around
Cause he ain’t got nobody to listen to

I’m blue
Da ba dee da ba

Premise

First, I do want to acknowledge that Crimson is a generic and powerful leader that when combined with the new tools from recent sets has been catapulted into the limelight due to the leader being able to facilitate a “goodstuff” midrange strategy featuring all the new/powerful cards. However, its recent performance is due to a lot more than its ability to include the good blue cards, it is actually due to the pace of the “best” decks.

Prior to the release of Fighter’s Ambition, and with the introduction of the new Ban/Errata List, Syn Shenron and SS4 were receiving the most scrutiny from the DBSCG community. To the extent where the majority of players believed that US Nationals was set to be a format split between the two with mayyybeee some SS3 and Gamma sprinkled in. This in my opinion was due to a severe lack of testing across the community and also a lack of understanding of the pacing of the format with the new tools that the Anniversary Box and Fighter’s Ambition provided.

Lets dissect the turn structure of Syn Shenron:

Turn 1 – Ball tutor (maybe), and leader skill to fetch

Turn 2 – Unison (if mono red), and biggest threat is the 4 drop + Haze

Turn 3 – Omega 8 is the largest threat, but they could also pivot to a Z-Card, either way they are using 2 energy if they want to commit to a true threat

Turn 4 – more of the same or SSB Vegeta SCR

Approaching Syn Shenron all you need to do is understand the threat potential, timing of threats, and the Z-Awaken power turn.

Now, lets look at SS4:

Turn 1 – cantrip

Turn 2 – Unison + hoping to awaken and deploy a 4 drop during the turn cycle

Turn 3 – More 4 drops, a Z-Card, or Goten

Turn 4 – More of the same, or 8 drop Gogeta

Approaching SS4 you need to understand that if they go first or second, they need you to attack for them to get an early awaken without overextending. The deck also feels reliant on the Unison, so disrupting that feels very plus. Lastly, they have a finite number of threats, and it is very easy to telegraph when they are coming down.

Now that we have identified these things, think about how Blue/Crimson Leader can punish each of these:

Crimson vs Syn – going 2nd

Turn 1 – leave up an energy for Gohan 8

Syn’s turn 2 – if they double strike + crit you, that usually ends up fueling your Awaken. Ultimately, you just want to combo your Gohan 8 and remove the 4 drop off board.

Turn 2 – ensure you have an energy available for a negate on the 8 drop swing

Turn 3 – play Beerus Z-Card, Awaken, and activate Beerus to clear board.

Turn 4 + Beyond – you are winning.

Crimson vs SS4 – going 2nd

Turn 1 – do not attack

Turn 2 – Smoke Dragon on Unison

Turn 3 – Usually you are awakening here. End the turn with energy open to have access to Dirty Burst, Goku Black 4, and Gohan 8.

Turn 4 + Beyond – you are winning.

You see, once it becomes apparent that both red decks need to push the pace, Crimson becomes the best counter punch archetype in the game. The more attacks that happen in the earlier parts of the game, the more advantage Crimson accrues with its frontside leader skill. Each time they get to pitch a Saiyan it drives them further towards not only their Awakening condition, but also helps them draw more answers to the problems that the red decks are trying to present. Then once Crimson hits turn 3, they draw 4 cards, have access to two extra energy, and get to address the board profitably. The pace then flips completely and now Crimson is in a dominant position.

The card filtering and raw draw power are the two things that the larger parts of the community never understood about the Crimson leader. However, prior to Anniversary Box and Fighter’s Ambition Crimson was decent at best, but once you start filling the deck with Kings and Aces – card filtering and raw draw power become king.

This perfect balance of pace and card draw then led to what you saw play out across multiple National Level Events. All of this sounds like a bit much for one deck to have, and ultimately starts to raise the question around if the leader or blue card pool needs to be addressed. My response – not yet.

Counter the King of Pace

Crimson is naturally rewarded when the opposing player swings with multiple threats early, turboing them towards their Awakening condition. This means that if you limit the number of offense/defense steps Crimson has, you also limit the number of cards they are seeing in the early parts of the game. This process also helps you limit the number of options the Crimson player has to charge each turn, since they’re more incentivized to charge their non-saiyan cards in hopes that they can meet their Awakening condition in timely fashion.

The next piece of this puzzle is limiting the number of opportunities the Crimson player has to deal with a threat on your turn, and also forcing Crimson to spend resources on their turn getting rid of a threat. Smoke Dragon is a very powerful card, but it costs two energy, doesn’t attack, and also doesn’t replace itself. This means that the keyword Barrier gets even more important for you, or a battle card that costs 6 or more which forces Crimson to commit to dealing with that threat on their turn as opposed to just waiting on activating a Gohan in Z or a Goku Black. This is where it is important for you to think about how you are going to navigate these exchanges; you obviously want to present threats and swing with them, but you also do not want to allow for Crimson to extract maximum value out of one turn cycle.

In conjunction with the above, you should plan to have a way to ensure that the Beerus Z-Card cannot impact the board at all. Cards like Android 18 counter play, Desperate Measures, Crusher Ball, Supreme Kai of Time Counter Play, Striving to be the Best, etc. ensure that Crimson cannot deal with larger threats right away – which is the sweet spot. You want to make their cards line up as poorly as possible against yours.

Now that you’ve controlled the pace in the first few turns and limited Crimson’s access to profitable removal, you are now in a position to where you want to turn up the pressure and force them to Awaken on your turn. It is important to go tall and make comboing out feel negative for them, this means you need to be completely aware of Unbreakable, Beerus Destroys, and Ultra-Instinct Kamehameha. If you can force the Awaken on your turn, this is how you steal the tempo from them since now on the following turn, they will only get 1 untap offensively – restricting their actions per turn and their ability to deal with your board.

Once this position is secured there seems to be only one card that could possibly unravel the entire plan – Son Gohan, Beyond the Ultimate. When playing with this card it honestly feels like the single best card, I have ever played in my life haha. It addresses the opponent’s entire board on play, bottom decks a life, and then allows for an incredibly powerful turn via the Activate Main/Battle skill. The card does the absolute most and can come down as early as Crimson’s turn 3. This is another reason why pacing is important – if you go all gas, flood the board, and allow Crimson to trigger their front side repeatedly, you are setting yourself up for Beyond the Ultimate to completely warp the outcome of the game. You need to be aware of this card at all times, and the best advice I have – do not get tilted when they have it, because in my experience they always have it.

Conclusion

Crimson is the current “best” deck in the format – and that is fine. As referenced above, the rise of this deck truly was a “perfect storm”. With all the new threats and answers, along with both red decks overwhelming the rest of the format, Crimson was in the right place at the right time to completely dominate the National’s format. With this domination though, also comes an opportunity for us all to grow as players, and for us all to better understand how to control the pace of any given game – something that usually requires you go against your intuition and everything you have practiced. This is where we all can pick up matchup percentage moving forward, and how we all should be approaching this new meta as we bring in the New Year.

When the moment comes though; turn 1, on the draw against Crimson – are you rushing? Or are you dragging?

#scrubfamisbestfam #kthxbai

That ACEC Thing… Again

Average Converted Energy Cost (ACEC) has been a key component of DBS Deck Building for a while now and with the recent updates made to the game entering the Zenkai format, we need to revisit the importance of this metric and how it has scaled alongside the spike in power creep we have seen.

Before we do that, I want to set the stage with the following opinion: Red and Blue have the best Z Battle Cards. This opinion leads me down the path of those being the “best” standalone colors in the game right now.

Just an example of where we are setting the bar:

Beerus, Airy Annihilator – Costs 2 & 2Z, Barrier, 10k, on swing it removes a large threat and pumps itself, then you can pay an additional UU to switch it to active, remove a threat, ignoring Barrier, and it gains Dual Attack for the turn.

Cell, Awakening of the Created – Costs 3 & 2Z, Deflect, 25k, Critical, on play removes all opposing threats, cost 5 or less, from play, and then can switch to active, and has the potential to gain Triple Strike.

Rush Attack SSB Vegeta – Costs 2 & 2Z, Deflect, 15k, generates free combo power, negs something by 15k, and then can gain an additional 10k, Double Strike, Barrier, and switches to active.

SS4 Son Goku, Defender of Life – Costs 2 & 3Z, Deflect, 20k, Double Strike, deals a damage, gains Barrier on play for the durn

The question then becomes, if these are arguably the best 2 and 3 cost cards in the game, and you always have access to them – how does our understanding of ACEC and the value of a card shift?

Let’s look towards the boogeymen of the format – SS4.dec and Dragons

SS4 is a top tier deck that has it all: efficiency, card draw, free combo, and the best 4 cost Battle Card in the game. With that being said, aside from the 4x Unison and the 3-4x SS4 Gogeta, the deck only plays cards that are free or costs 1 energy.

4x Unison – 8
3x SS4 Gogeta – 12
4x SS4 Son Goku, Preparing to Brawl – 2 (Assuming they will be free 50%)
4x SS4 Vegeta, Preparing to Brawl – 2 (Assuming they will be free 50%)
4x Vegeta, Rivalry United – 4
4x Son Goku, Rivalry United – 4
4x Son Goku, Adventure’s Advent – 2 (Assuming they will be free 50%)
3x Rushing Warrior Pan – 1.5 (Assuming they will be free 50%)
2x Crown – 2
1x FDC – 1
3x VIP – 1.5 (Assuming they will be free 50%)
4x Super Combo – 0
3x Testing the Opp – 0
1x Dark Broly OR – 0
1x SCR – 0
4x Tutor Vegeta – 0
3x Bean Goku – 0

Total Energy Cost = 40
Total Energy Cost/Total Cards in Deck: 40/52 = 0.76 ACEC

Dragons is a top tier deck offering a hyper aggressive strategy with solid card advantage and very powerful removal that attempts to either put the game away or put the game very far out of reach within the first few turns. Aside from the decks premier threat in Omega 8, and the SCR, the rest of the deck costs 1 or less.

Dragons

6x Balls – 0
4x Syn, Dread Destroyer – 4
4x Omega 8 – 8
4x Haze, Gathering Evil – 2 (Assuming Activating from hand 50%)
4x Oceanus, Assembling Evil – 2 (Assuming Activating from hand 50%)
4x Nuova, Tenacious Evil – 4
4x Eis, Reanimating Evil – 4
4x Naturon, Congregating Evil – 4
4x Beerus Super Combo – 0
4x Testing the Opp – 0
3x Dragon Thunder – 0
2x Beerus, Unceasing Rage – 2
2x Almighty Resistance – 4
1x Vegeta SCR – 4

Total Energy Cost = 38
Total Energy Cost/Total Cards in Deck: 38/50 = 0.76 ACEC

When we look at these two powerhouses within the format, we quickly see how much 1 energy is worth in their respective archetypes. Vegeta and Goku, Rivalry United are both 1 cost, 20k bodies, with very relevant skills; and Syn, Dread Destroyer is a 1 cost, 20k double striker, that draws a card on play, and has an incredibly relevant attack trigger. Essentially, both archetypes have access to an SS3 Gogeta, Thwarting the Dark Empire – but much easier to play, and in some cases are better.

Turn by Turn Scaling

With SS4.dec and Dragons being the gatekeepers of the format, it is important to recognize how they scale during the first few turns, and what their ceiling is in terms of actions/attacks they can generate on their awakening turn. Dragons are the most explosive of the two since they feel at their best going wide with their energy on turn 2 instead of devoting that 2 energy to a Unison, whereas SS4 really thrives with the Unison in play so it sacrifices going wide for the advantage engine.

The next time you’re testing, be sure to track all the actions and attacks taking place the first few turns of your games. This is important to understand when it comes to selecting your next deck, and properly preparing to face these decks moving forward. Now that we have set the stage of the work you should do to properly understand the strength of the two red decks, each with an ACEC of 0.76, let’s look at the real reason why we’re here.

The Most Important Card Previewed

[Auto] U, if your Leader is Blue: When this card is added to your Z-Energy, choose up to 1 of your opponent’s Battle Cards with an energy cost of 5 or less and place it at the bottom of its owner’s deck.

Yep. That is a card.

We’ve just spent most of this article trying to identify the true value of 1 energy/1card, but it has mostly been based around offense. Power Reclaimed takes this and turns it on its head because now there is a way to get rid of a very relevant threat for 1 energy, that can’t really be interacted with. If you go through the pool of relevant decks, you’ll see a lot of threats that cost 5 or less that this card just absolutely dumpsters. Not only that, but with the introduction of Z-Energy rewarding you for comboing, it isn’t like you’re just going neg on the exchange – you get your money back when you then drop a card like Beerus or Cell.

I know, I am probably hyping the crap out of this card and people will think I am crazy, but just hear me out on a more nuanced topic – what happens when a game goes late and your ACEC is low?

We talked about scaling and how the above decks really focus on trying to end the game within 4 turns. One thing we don’t usually touch on is what happens when those decks can’t win on turn 4, or earlier. ACEC ends up going out the window completely, because as your pool of energy expands, your card quality is not scaling with it.

Syn, Dread Destroyer, and the Rivalry United cards are absolute monsters during the first 2 – 4 turns of a game, but once the opponent gets to their turn 4, 5, 6, etc. the quality of those cards just doesn’t line up with the high-cost cards your opponent now has access to. Additionally, you lose the squeeze on resources that comes from “fighting in a phone booth”, since when a game is compressed, the defending player has less chances to draw the out. With another way to stifle aggression, and the recent ban list, blue has yet another way to drag the aggressive player into deep water, allowing them plenty of time to concoct how they’re going to demoralize the enemy.

Conclusion

I could end up being completely wrong about this, but my gut is telling me that the format went from one extreme, to a slightly less extreme, but in the opposite direction. Don’t get me wrong, both red decks are going to continue to be the gatekeepers for the rest of the decks trying to dip their toes into the competitive pool, but ultimately, even with Bean being errata’d, blue is coming out as the biggest winner post-bans. Between Dimension Magic, Baby Hatch SCR, the rest of the floodgates, Buu Unison, Dirty Burst, Beerus Z, Cell Z, and now Power Reclaimed… the color is almost guaranteed to make it to the late game. Now it is up to you find out how you’re going to take advantage of it.

Pre-Side BO1: Aggro Syn

Untap List:

//play-1
1 Syn Shenron // Syn Shenron, Negative Energy Overflow (bt10-093)

//deck-1
1 The Power of a Super Saiyan (bt13-120)
2 Krillin, Moments Before Comeback (bt11-097)
2 Zamasu, Sacred Disbelief (bt9-091)
3 Negative Energy One-Star Ball (bt10-119)
3 Syn Shenron, Destruction Incarnate (bt10-115)
2 Furthering Destruction Champa (bt1-005)
2 Swift Retaliation Cooler (ex06-27)
1 Pan, Time Patrol Maiden (bt15-155 scr)
2 Omega Shenron, the Ultimate Shadow Dragon (p-284_pr)
2 SS4 Bardock, Fighting Against Fate (p-261)
3 Syn Shenron, Shadow Dragon Leader (bt10-116)
4 Oceanus Shenron, the Anemancer (bt12-113)
4 Haze Shenron, Venomous Mist (bt10-117)
4 Nuova Shenron, Flame Shot Unleashed (bt12-109)
4 Eis Shenron, the Cryomancer (bt11-112)
4 Omega Shenron, Allies Absorbed (bt12-108)
4 Rage Shenron, the Electromancer (bt12-112)
4 Negative Energy Five-Star Ball (bt12-116)

//sideboard-1
2 Oceanus Shenron, Negative Energy Explosion (bt14-135)
2 Vegeta, Unison of Fury (ex12-02)
1 Max Power Kamehameha (ex13-34)
2 Frieza, Divine Transformation (bt12-100)
2 Forbidden Power (bt15-119sr)
3 Mechikabura, Plotting Revival (bt10-096)
1 Syn Shenron, Destruction Incarnate (bt10-115)
1 Syn Shenron, Shadow Dragon Leader (bt10-116)
1 Negative Energy One-Star Ball (bt10-119)

DBS Fest events are coming up, so I thought I would take some time to discuss a powerful and flexible archetype that would allow you to pivot each round depending on your level of comfort with each matchup you face throughout the day.

Aggro Syn… Still Bananas

First, let me say that I understand with the banning of Fu, Shrouded in Mystery, that Control Syn is definitely a contender. The thing is, having the ability to put any deck on the backfoot with the potential of winning on turn 3 every game is really hard to ignore.

Aggro Syn is probably the most efficient and consistent aggro deck that exists and the ability to catch players off-guard when they’re expecting Control Syn is incredibly appealing to me. Not only that, but since we’ve lost Power of a Super Saiyan, we are now given the opportunity to try something different and use those card slots for aggressive tools like Furthering Destruction Champa and SS4 Bardock, Fighting Against Fate. The deck also can reliably deploy Pan SCR offensively as another free threat that can go for lethal when you reach critical mass.

The other thing that is appealing about catching players off-guard with Aggro Syn is that their removal options and floodgates may be flat out wrong. You also pick up huge percentage against decks that rely on charging dual-color cards in order to keep their deck functioning. This means that games when you’re on the play, you’re almost guaranteed to have a turn 3 kill as long as you have the means to awaken and get your normal board established.

Turn 1 – Eis for Rage Ball

Turn 2 – Leader swing, activate Rage Ball, Rage 2 swing, Oceanus into Nuova, play Nuova, rest Nuova, play Syn 4 from drop, sack Rage 2 for Omega 8, warp Oceanus, pass turn.

Turn 3 – Warp Rage 2 and take a life, play 9 drop Syn, swing with Omega and take a life, awaken, activate an Oceanus, rest Nuova to get Eis, Leader swing combo to 25, Eis swing, combo to 25, Swing Syn 9, combo to 40, Warp 7 dragons to play Omega Triple Striker, Over Realm 6 for Fighting Against Fate, play a One-Star Ball, Activate One-Star Ball for Syn 4 drop.

Against slow decks, this deck is an absolute dream. When you are lined up with other aggressive decks or midrange decks though, we can pivot completely since 4x Rage Ball, 4x Rage 2, 4x Nuova, 2x FAF, and 2x FDC are all “flex” slots and allow more than enough room for you to get your control package plus relevant tech cards.

We all know that Soul Striker, Gogeta: Xeno, Golden Frieza, and King Piccolo are the 4 decks that folks are talking about the most. Soul Striker has a hard time dealing with Aggro Syn, and so does King Piccolo. Against Gogeta: Xeno you’re incentivized to be more of a hybrid variant because Gogeta likes to tap out on turn 1 and 2. Against Golden Frieza, you can pivot and rely on your late game in order to win. Basically, Syn Shenron is the only leader that can offer you the ability to cover your matchups by playing three completely different variations between your main deck and sideboard. That is pretty insane to think about.

Conclusion

There are definitely some changes that could be made to the sideboard for whatever you fear the most or you just wish you had more of. There is also an argument to expanding the main deck to 52-54 cards to get some of those control pieces in the main to open up your sideboard even more. This list however is really trying to keep the main deck lean so that we can consistently reach that critical mass turn. What I really want to drive home here is that although Control Syn is a strong pick for these upcoming events, playing Aggro Syn or Hybrid Syn is probably going to be your best option if you’re trying to take advantage of this new competitive format. Happy testing <3.

#scrubfamisbestfam #KTHXBAAAIIIIII

Dropping the (Post-Ban) Hammer with Gogeta: Xeno

Untap List

//play-1
1 Son Goku & Vegeta // Gogeta, Fateful Fusion (bt12-122)

//deck-1
3 Mira, Dimensional Superpower (ex15-05)
1 Pan, Time Patrol Maiden (bt15-155 scr)
2 Furthering Destruction Champa (bt1-005)
2 Super Kamehameha (bt8-104)
3 Supreme Kai of Time, Time Labyrinth Unleashed (bt13-135)
4 SSG Trunks, Power Awakened (bt16-107)
3 Secret Identity Masked Saiyan (bt10-140)
4 Vegeta, True Fighting Spirit (bt12-133)
4 Son Goku, True Fighting Spirit (bt12-128)
4 SS Vegeta, the Prince Strikes Back (bt11-130)
4 SS4 Vegeta, Feigned Greeting (p-307)
4 SS4 Son Goku, Beyond All Limits (p-262)
4 Supreme Kai of Time, Summoned from Another Dimension (p-288)
3 Gogeta, Fearless Fusion (bt12-137)
3 SS3 Gogeta, Marvelous Might (bt12-136)
4 SS3 Gogeta, Thwarting the Dark Empire (p-308)

With the long-awaited ban announcement taking place, GoX (Gogeta: Xeno) looked to be one of the primary targets on the list. Although the hit did take away some of the raw card advantage for the king of thwarting, it still left us with an easy shell to alter. Additionally with ROTG, the archetype picked up such a strong addition with SSG Trunks, Power Awakened.

Just the Beats and Only the Beats, Please.

SSG Trunks truly is a homerun for the archetype that adds a threat that doesn’t have to be played from hand, a 20k Dual Attacker, and a way to easily fuel powerful Over Realms such as Secret Identity, SS4 Son Goku, and SS4 Vegeta. All-around the card is an absolute banger and provides such a high amount of pressure at any stage of the game.

Turn 1, Thwarting

Turn 2, SSG Trunks + Fatty Over Realm

If you’re on the play, how is any opposing deck going to deal with you.. profitably? They’re not.

This is probably the best first two turns you will see from any deck in the format, and GoX is the best at facilitating it. The deck overall may have lost those advantage pieces with Smoke Dragon and Trunks 3 being banned, but the deck added the fattest beats to make up for that loss.

Unison Adjustment

Mira is the boy. The ability to tick up to warp a Trunks or a piece needed for fusion is exactly what this deck wants/needs. Additionally, the -2 ability is something the opponent always has to be concerned about as the game goes on. Again we’re losing that raw advantage from Smoke, but we’re picking up a value generating Unison that creates tension.

A Lesson Learned

As with every archetype I test and attempt to master, there is always a lesson to be learned and passed onto future Matt. With the game of DBS changing so much over the last year, we too must evolve and learn that the rules of engagement must change as well. DBS last year was definitely focused on maximizing the power level of your deck, whether it be offensively or defensively, within the first 3 turns of the game. This meant that you’d sacrifice card quality in some spots in order to reach critical mass at the appropriate time and establish control of the game.

DBS now is wildly different. With the amount of bans put in place, floodgates available, and checks within a given format; games now are going to go to turn 4 and beyond, almost always. What this means is that your deck must consist of absolute bangers across the course of the game, or have ways to consistently draw bangers every single turn. When you look at decks like Soul Striker and GoX, there is such a low number of cards that you’d hate to draw on turn 4 and beyond. This, along with other factors, is why then end up being so strong. They don’t require you to play niche, engine based cards. Instead, you’re left with just.. bangers.

Whereas when you look at decks like King Piccolo and Syn Shenron, and you breakdown each card’s raw power level.. they definitely come up short in those spots. The only difference is that Syn Shenron has a high potential early game, and a turn 6 ability to establish board control. Whereas King Piccolo’s card power level stays medium throughout the entirety of the game with no crazy spikes.

Golden Frieza is interesting because the deck does have high card quality, since it is Yellow. The major difference is that it must play lesser cards to act as a velocity engine to power you through your deck to find your high-powered threats.

This philosophy leads me to believe that Soul Striker, Gogeta: Xeno, and Golden Frieza make up Tier 1. King Piccolo and Syn Shenron end up being a step behind at Tier 1.5.

Conclusion

Gogeta: Xeno would easily by one of my top picks for the fest events coming up. People may be trying to strategize against you, but everything changes when they’re staring down Thwarting and SSG Trunks in the first two turns. I encourage you to test the list as is before making any wild tweaks. In general, I think this shell is a great starting point and provides you with enough power and consistency to show you how good the tandem of Trunks and Thwarting really are. That and you’ll probably be inspired to explore more Over Realm options in the future. Happy testing ❤

#scrubfamisbestfam #KTHXBAAAIIIIII

ROTG Brews: UG Control – Army of One

Untap List:

//play-1
1 Broly // Broly, Evil Unleashed (sd8-01)

//deck-1
2 Dr. Rota, Unknown Potential (db2-042)
1 Son Goku and Son Gohan, Saiyans of Earth (db1-091)
1 Son Gohan, Confronting Invasion (bt15-071)
1 Nappa, On Guard (bt15-085 r)
4 Hasty Dispatch Dyspo (db2-092)
1 Supreme Kai of Time, Spacetime Unraveler (bt12-154)
1 SS3 Son Goku, Man on a Mission (bt11-127)
2 Majin Buu, Unadulterated Destruction (bt14)
3 Zarbon, Cosmic Elite (p-223)
4 Majin Buu, Unadulterated Malice (bt14-082)
4 Senzu Bean (bt1-053)
1 Jiren, Army of One (db2-123)
3 Realm of the Gods – Champa Destroys (bt16-069 r)
4 Cell’s Earth-Destroying Kamehameha (bt9-132)
4 Android 16, Steadfast Comeback (eb1-64)
4 Kusu, Angel of Universe 10 (bt16-139)
4 Android 18, Bionic Blitz (bt9-099)
4 Ribrianne, Punishing Passion (db2-069)
2 Broly, Unrealized Ambition (bt6-063_pr)

With Realm of the Gods releasing soon-ish and the new ban list removing Cell Surge from the format, this created a void that left Green in a really awkward place. This is mostly due to Saiyan Showdown and Realm of the Gods providing very little to support to Green as a whole. Realm of the Gods did however introduce two key cards that drew my attention back to hand control, Kusu and Realm of the Gods – Champa Destroys.

Why Starter Broly?

Put on the map in recent months by the Asian National Championships and then Wang Poh Ann finishing top 4 at the World Championships, it was proven that Starter Broly had the makings of a championship level strategy. Here are a few reasons why:

The leader promotes protecting life in the early game – when you can combo your hand away knowing that you’re going to awaken and draw a fresh set of six cards, it creates awkward exchanges for the opposing player since they don’t know when you’re going to take life or choose to protect it.

The leader refuels every turn – this to me is probably the biggest reason why I took the approach with the list above. The ability to draw so many combo based cards that drive hand destruction on a turn by turn basis is absolutely game warping. Not only that, but you’re pretty much guaranteed to see every card in your deck, which means you don’t have to play a high number of finishers.

The leader has built-in removal every turn – tempo in DBS has shifted more and more towards battlefield presence. As the game has become more fair and actions per turn as come down substantially, having a leader that can remove any threat every turn without paying energy is something that is pretty broken.

What does this deck do?

In this list we want to spend our energy and resources on our opponent’s turn to reduce their hand size as much as possible. We then abuse the leader’s ability to draw a fresh set of cards every turn to keep fueling this strategy. As the game winds down we want to win through slowing chipping away at our opponent while managing their resources, or one-shot them with Jiren, Army of One.

We NEED to Combo

We have 19 cards that allow us to discard the opposing player’s cards during the combo step. This is the main reason we are cutting negates outside of Buu. Especially since Buu plays really well into the hand control strategy, and is a card we can combo to setup Army of One.

I have also thought about playing the 4th Champa Destroys and the full 4 Marcaritas, but 4x Senzu Bean isn’t enough to play all these 1 cost combo cards lol.

*Note: To avoid being punished by Zamasu/Cheelai Super Combo on our turns, we need to combo our cards defensively so that our first swing on our turn can be the refuel.

We got that good D

Another neat part of this deck, which was a late addition by Frisco Fahs, is the Dyspo/Blocker package that keeps fueling our defense or our leader’s removal ability.

Dyspo is another free combo with a ton of upside for this deck. The ability to just bring back a blocker at will to end your turn, or to turn on your leader skill is just too much value to pass up. Especially since we aren’t really doing things on our turn, aside from maybe spending two energy to activate a Ribrianne.

Nappa, On Guard is a blocker with some super cute upside. Son Gohan, Confronting Invasion provides a way to help reduce Unison Markers and self-awaken, and Rota is pure value by allowing you to untap your only Blue energy.

With this package, Zarbon, Buu negate, and plenty of combo power – it is going to be incredibly hard for decks to break through and kill us before we reduce their hand size to 0.

How are we winning?

It is a long, grindy road to victory but we do have a few ways to close a game out:

1.) Chip shots plus hand control

2.) Man on a Mission plus existing board to take opponent from X to 0.

3.) I have been waiting so long for this…

Probably one of the coolest cards ever printed and honestly, with a lot of these combo based hand control cards, Army of One is finally setup to see some major shine. Being able to combo your hand down to just Army of One while reducing your opponent’s hand to 0 feels borderline oppressive at times. I truly hope everyone messes around with this style of win condition as we get further into ROTG testing.

A Lesson to be Learned

A lot of folks have probably already gathered this while playing DBS, but it has become much more clear to me as of late that Hand Control is probably the closest thing to a true control strategy in DBS when compared to the traditional archetypes across other games. When playing control, you’re focused on reducing your opponent to 0 threats on board and minimal cards in hand while protecting your life total in an effort to turn the corner and close out the game with one of a few win conditions within your deck. Your deck is constructed with the majority of cards being ways to answer your opponent on a 1 for 1 and X for 1 basis, with the leftovers being slots for actual threats/win conditions.

Isn’t that insane how that description matches DBS Hand Control so perfectly? I know I am probably late to the party lol, but just wanted to share my own revelations. If anything, this makes me an actual fan of Hand Control strategies, whereas before I was always kind of medium on them.

Anyways… happy testing ❤

#scrubfamisbestfam #KTHXBAAAIIIIII

Realm of the Gods: LebronJames.dec

Untap List:

//play-1
1 Trunks // SSB Vegeta & SS Trunks, Father-Son Onslaught (bt16-071)

//deck-1
2 Secret Identity Masked Saiyan (bt10-140)
2 SS Trunks, Altering the Future (bt13-093)
4 Mecha Frieza, Robotic Riposte (p-331)
2 Swift Retaliation Cooler (ex06-27)
4 Son Goku, Steadfast Assistance (bt15-096 sr)
1 Zamasu, Sacred Disbelief (bt9-091 c)
3 Krillin, Moments Before Comeback (bt11-097)
1 Bergamo, Ferocious Roar (db2-108)
1 Pan, Time Patrol Maiden (bt15-155 scr)
1 Furthering Destruction Champa (bt1-005)
1 Putine, the Dark Sorcerer (bt10-139)
4 Turles, All Too Easy (bt15-107 sr)
2 Realm of the Gods – Black Kamehameha (bt16-092)
2 Frieza Army Reinforcements (eb1-48)
2 Vegeta’s Final Flash (bt9-133)
4 The Power of a Super Saiyan (bt13-120)
4 Bulma, Future on the Line (bt16-084)
3 Vegeta, Father-Son Teamwork (bt16-079)
3 Trunks, Father-Son Teamwork (bt16-083)
4 SSB Vegeta, Future on the Line (bt16-077)
4 SS2 Trunks, Future on the Line (bt16-081)

With Realm of the Gods we already touched on the other “top tier” archetype, Red Goku Supreme, but today I want to take you through my current list for what I believe is far and away the best deck coming out of ROTG – Yellow Trunks/Vegeta, aka “LebronJames.dec”, because this deck truly does do it all.

A segment about tempo in current standard DBS

Before diving into why this deck is so strong, I want to take a second and talk about how the definition of tempo in DBS has shifted, for better and for worse.

In previous formats, tempo in DBS was determined by APT (Actions Per Turn) and ACEC (Average Converted Energy Cost). This meant that top tier decks were, by all standard card game definitions, broken. Games were less about the trading of resources and more about reaching critical mass as quickly as possible and snowballing that supreme advantage into a win.

Coming off of a ban list, then Nationals/Worlds, and now with Realm of the Gods, we’re in a completely different world. Tempo has now shifted back into being about the ability to use most of, if not all of your energy on both offense and defense, addressing board states on an X for 1 basis, and maintaining card advantage/parity on a turn by turn basis while playing offense and defense. This overall is a much healthier place, but leads to formats being much easier to solve when you have clear-cut best leaders/archetypes that do the above items better than the tier below them.

Spoiler alert: Trunks/Vegeta combined with the available yellow toolbox checks all of those boxes and is clearly a top tier archetype.

What does Trunks/Vegeta offer you?

Yes, Trunks/Vegeta forces you into playing the cards within the archetype, but there is no downside. SS2 Trunks, Future on the Line is probably one of the most absurd tempo generators we have ever seen. With your awakened ability, it draws 2 cards on play, offers you a Barrier Blocker, and includes an auto ability that dictates the way your opponent has to structure their turns. This is one of those cards I have talked about recently that creates tension.

In case Yellow didn’t have enough, the archetype also offers you SSB Vegeta, Future on the Line which again draws 2 with your leader ability on play, then also lets you KO any Battle Card in rest mode, ignoring Barrier. This means that combined with Yellow’s other disruptive effects like Riposte and Steadfast, we now have a super clean, efficient answer to any opposing threat at anytime that also draws us 2 cards.

The craziest part about this archetype is that the leader acts as the facilitator:

Just the ability to awaken early and ensure your engine is always online is really over the top. There is 0 downside to opting to play a Trunks , Vegeta, or Bulma from drop, your first evolve each turn draw 2 cards, and you now have a leader with built-in Double Strike that pairs beautifully with Swift Retaliation Cooler, as if that card needed any buffs.

The level of defense is offensive

One of the things that has stood out to me with this archetype is that once you have a Trunks 3 drop online, and you combine it with the other tools Yellow has available, games become about whether or not you want to let your opponent do something to you, or if you want to take a damage.

See below:

Against this lineup plus the additional threats of:

How does any “fair” strategy play around all of the tools you have at your disposal. As stated above, games end up being played on your terms which truly is the ultimate form of control in DBS.

The amount of removal is offensive

Trunks Unison offers a high impact attacker with the ability to use the 0 ability to neutralize a smaller threat, or the -3 ability to draw a card and get a strong X for 1.

Turles, All Too Easy on play has the ability to draw a card and KO 1 threat, or KO 2 threats on play.

SSB Vegeta has the ability to kill any threat in rest mode.

Secret Identity is the best Over Realm and always nets an X for 1.

It is just insane how many tools this archetype has access to.

You will notice that I excluded Trunks/Vegeta 8 drop from the deck:

While I do love the card, I am just a huge fan of reducing the number of cards that I can’t combo and more importantly, getting my money’s worth right now. I want my cards to pay me immediately, and with the amount of disruptive effects running around, Trunks/Vegeta 8 drop is just too risky/costly of an investment at this time.

And for those reasons:

I'm sorry But I'm out - Mark Cuban is not impressed | Meme Generator

Conclusion

If you’re looking to make an investment in Realm of the Gods, Yellow Trunks/Vegeta is where I would invest my money. The required cards from the set for the archetype are all easily attainable/affordable since they are lower rarities and this means all of your cards you have obtained from previous sets continue to get a ton of use. The jury is still out on Icarus vs Trunks/Vegeta, but to address a wide meta game, I love the versatility that Trunks/Vegeta provide within their engine. Another thing is that this archetype is forgiving enough for all levels of player, but leaves a ton of room for mastery so you can sleeve this up at any competitive event and have a chance at topping. I know there is a ban list announcement looming so we’re all holding our breath to see what happens to Power of a Super Saiyan, but in the meantime, enjoy this list posted above on Untap and as always – Happy Testing ❤

#scrubfamisbestfam #KTHXBAAAIIIIII

Realm of the Gods: GY Jiren

Untap List:

//play-1
1 Jiren // Full-Power Jiren, the Unstoppable (bt9-053)

//deck-1
1 Pan, Time Patrol Maiden (bt15-155 scr)
1 Fu, Shrouded in Mystery (bt3-118)
4 Son Goku, Steadfast Assistance (bt15-096 sr)
2 Son Goku, Return of the Dragon Fist (bt14)
2 Basil, Fatal Rampage (db2-111 (2))
4 Mecha Frieza, Robotic Riposte (p-331)
2 Swift Rescue Dyspo (ex19-19)
1 Zamasu, Sacred Disbelief (bt9-091 c)
3 Krillin, Moments Before Comeback (ex19)
3 Vegeta, Unison of Fury (ex12-02)
4 God of Destruction Toppo, Skillbreaker (ex19-18)
3 Dyspo, Unprecedented Speed (bt9-121)
3 Realm of the Gods – Black Kamehameha (bt16-092)
4 The Power of a Super Saiyan (bt13-120)
4 Marcarita, Angel of Universe 11 (bt16-144 sr)
2 Frieza, Divine Transformation (bt12-100)
3 SS Trunks, Altering the Future (bt13-093 spr)
1 Putine,The Dark Sorcerer (bt10-139 uc)
3 Toppo, Bestower of Justice (p-199)

Realm of the Gods definitely has some solid archetypes that will make a splash on the competitive scene. As always though, I love to dive into the lower tier of decks from the past to see if there is anything interesting going on that is worth exploring and has the ability to teach me something new while playing some interesting games of DBS. This version of Jiren checks all of those boxes.

The New Tools

Marcarita, Angel of Universe 11 is an absolute homerun for the archetype. It is another Universe 11, with Barrier, that you can play for free off of your front side leader skill, it can make your opponent discard a card on play or when combo’d, is a blocker, and lastly it gives you a reliable answer to Battle Cards played via skill or when an opponent triggers a Counter skill.

Realm of the Gods – Black Kamehameha is another way to avoid having to activate your leader skill on defense, provides the upside of being a strong removal effect during your turn, and offers you another highly playable extra card to get your Riposte and Steadfast online early.

What is this deck about?

Jiren in previous formats offered the ability to abuse the Successor mechanic and produce an overwhelming amount of attacks, alongside a combo-oriented endgame with Cell Xeno on turn 2/3. Once Set 10 was released and we saw the rise of free counters and decks with reduced ACEC (Average Converted Energy Cost), Jiren then had to transition to more of a midrange deck only used to take advantage of specific meta game shifts.

This variant of the deck still stays focused on playing a solid midrange game, but leans much harder into powerful cards across the progression of your energy curve to make up for hand/board size disparity. For instance, your standard flow often is:

Get a Marcarita established on turn 1.5.

Disrupt your opponent’s board on turn 2 via tap effects.

Deploy a SS Trunks Unison and Awaken on turn 3 to pressure the opponent’s life total or board. Then leave up an energy to save your Trunks from losing markers.

On turn 4, get the highest value out of your SS Trunks Unison before playing Toppo 4 and either stacking markers on Unison of Fury, or pressuring life total via the -3.

Play a Frieza 5 or Dragon Fist on turn 5 to either stabilize or take over the game.

Hopefully play a Fu, Shrouded to close the game out on 6, if the game gets that far.

The reason for this is because at each spot of the curve turn 3 and beyond, we have to be deploying a threat that either gets us back in the game or puts us ahead. These threats also require multiple answers. SS Trunks requires 20k swings, Toppo 4 drop requires removal and Vegeta Unison requires attacks invested, and Frieza 5 is an x for 1 that can’t be answered by skills. Couple these threats with our leader’s ability to be invulnerable and we now have a solid way to stay in each game with the potential of completely taking it over and grinding out a victory.

Overcoming the challenge of not drawing enough cards

Even if you don’t sleeve up this deck, we all know that we all have our favorite archetypes that fall victim to this new world of drawing 2 or more cards a turn and drawing 3+ cards on Awakening. It ain’t easy to keep up with these youngsters, which means that the overall power level of the cards in your deck must be higher on average in order to be successful. This leads us to rely on powerful effects that can net x for 1’s and often forces us into a more curve based approach since we can’t afford to lose pace both in hand size and board size. Not only that, but we also need to play more copies of these higher costed, impactful cards since we don’t have as high of a chance to draw them as our opponent’s do.

If you’re able to keep pace with your powerful, curve based, x for 1’s then you have the ability to keep the game close to parity, if not swing it into your favor. This ties us into our last article where we talked about creating tension. If you’re able to establish a tension generating threat on board multiple times over, this is how you will catch up on tempo, hand size, and board size. The major difference with an archetype that draws less cards is that you won’t have the ability to “pour it on”/overwhelm the opponent with your advantage; instead, the game is much more grindy even when you’re ahead.

Conclusion

Jiren is a solid tier 2 archetype that offers a lot of fun and interesting games. Not only that, but it also allows you enough open deck building space to be creative and try out some cards you may have never been able to test before. I personally have been playing a lot of games with this archetype over the last few weeks, and each time it either impresses me with how well it can perform, or teaches me something regarding deck building or the upcoming format pacing that will all translate to the other, more competitive decks I am working on. I hope you get a chance to enjoy some games!

Happy testing ❤

#scrubfamisbestfam #KTHXBAAAIIIIII